You may have already encountered Kamal (ex MRSK) - the latest deployment tool developed by the Basecamp team. In this article, I’ll delve into its functionality and highlight the reasons why it’s gaining so much popularity.
Kamal stands out for its simplicity and user-friendliness, offering a seamless solution without the need to navigate the intricacies of complex DevOps frameworks. To demonstrate its efficiency, DHH showcases how he deploys an application across two different cloud environments in a mere 20 minutes. This impressive feat illustrates Kamal’s capability to streamline the deployment process and swiftly bring your Minimum Viable Product (MVP) to life.
What we’ve used before?
In 2023, you have a plethora of options to deploy your application in a production environment, ranging from simple and versatile solutions like Capistrano to more intricate, platform-specific choices such as AWS Elastic Beanstalk and Kubernetes. While we predominantly utilized Elastic Beanstalk for most of our projects, Capistrano still played a significant role in certain scenarios.
What is Kamal and how it works?
Kamal is a Ruby-based orchestration tool that leverages SSHKit, similar to Capistrano. According to its official website, Kamal utilizes the dynamic reverse proxy Traefik to manage incoming requests. This seamless transition between the old and new application containers ensures uninterrupted service across multiple hosts. By utilizing SSHKit, Kamal executes commands efficiently. While initially developed for Rails applications, Kamal can be used with any web application that can be containerized using Docker.
When I first came across this concept, one question immediately arose in my mind: “Where does Nginx fit into this architecture?” Having been involved in Ruby on Rails development since around 2008 or 2009, I’ve witnessed numerous changes over the years. We’ve worked with various application servers like Mongrel, Passenger, Unicorn, and Puma, and have used different versions of Ruby (starting from 1.8.6 or 1.8.7, if memory serves me right). However, throughout all these changes, one constant presence has been Nginx. It has played a crucial role in our infrastructure, serving as a reliable web server. Nginx is a required part of any scheme. Now it is gone and Traefik comes into the stage.
So what it Traefik? Traefik is a cutting-edge reverse proxy and load balancer that simplifies the deployment of microservices. One of the standout features of Traefik is its seamless integration with Docker. Traefik has built-in capabilities to configure itself automatically when used in conjunction with Docker containers. This means that as you deploy new containers or update existing ones, Traefik dynamically adapts its routing and load-balancing configuration to accommodate these changes. It eliminates the need for manual configuration updates, saving time and effort for developers and operators. Whether you’re scaling your application horizontally or introducing new services, Traefik seamlessly adjusts its routing rules to ensure smooth and efficient traffic distribution within your Docker environment. This tight integration between Traefik and Docker provides a streamlined experience and helps maintain a highly dynamic and scalable infrastructure.
Kamal + Amazon AWS possible schemas
AWS offers a plethora of networking options to organize your application infrastructure. The image below illustrates one of the most commonly used schema that can be used.
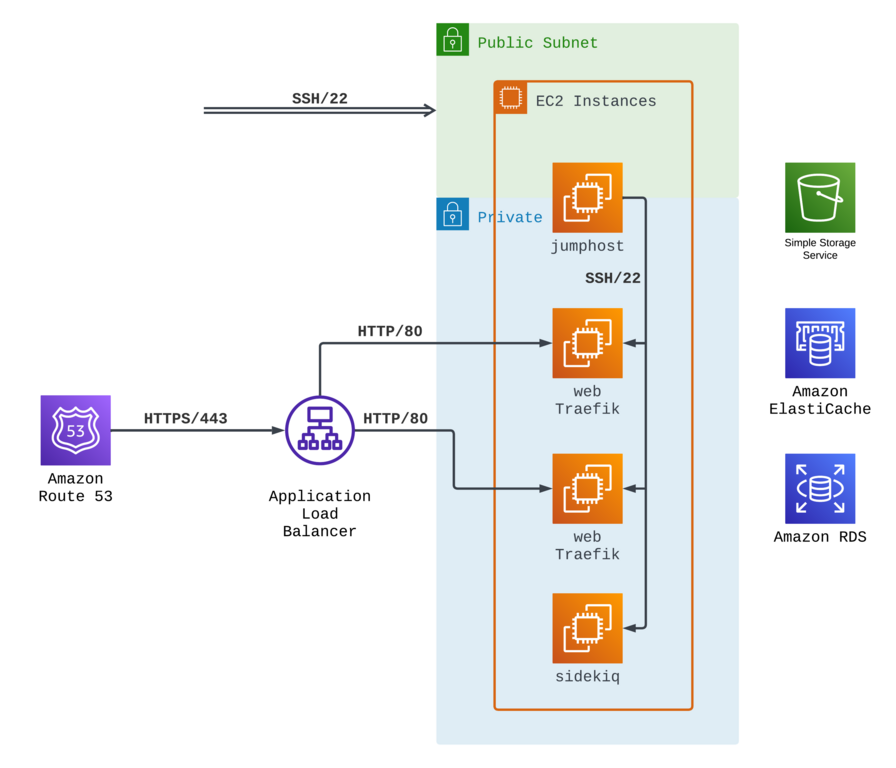
Our domain is hosted on Route 53 in this network schema, pointing to an AWS ALB. All traffic is routed to the ALB, where SSL termination occurs. The HTTP traffic is directed to one or several EC2 instances managed with Kamal. Traefik on these instances routes the traffic to the Rails container, ensuring efficient request processing and optimal performance.
In this setup only a single EC2 instance, known as the “jumphost” has a public IP. On the other hand, all other instances are assigned private IPs, and the routing of HTTP traffic is facilitated within private networks via the ALB (Application Load Balancer).
Of course using a “jumphost” is optional and you can assign public ip addresses to all instances, however this setup offers heightened security by reducing the exposure of instances with public IPs, thereby minimizing the attack surface. The infrastructure adds an extra layer of protection by leveraging private IPs and utilizing internal routing through the ALB. This ensures that HTTP traffic remains securely managed within the private network, resulting in a resilient and dependable environment for your application.
How to deploy your web application with Kamal?
Before starting work on actual code and scripts, lets understand Kamal basic principles:
- You can deploy any application with Kamal. It doesn’t matter what language or framework you use.
- The only requirement for Kamal to work is a Dockerfile.
- Kamal can be used to build and deploy from your local machine or from any CI/CD service.
All scripts and scenarios shown below represent the most simple AWS where all EC2 instances have public IPs. I will use Ruby on Rails 7 application as an example.
Prepare application to run in a container
My application wasn’t dockerized, so we will start by creating a Dockerfile. Starting from version 7.1 Rails have Dockerfile out of the box, so the best idea would be to use Dockerfile template from the main branch on the GitHub.
# This first and main rule that we follow in our Dockerfile is to keep it
# without hardcoded dependencies and versions as much as possible.
# This file is an ideal – it has zero.

# It accepts selected Ruby version as an argument.
ARG RUBY_VERSION

# Create new stage from ruby-slim image with selected Ruby version.
FROM ruby:$RUBY_VERSION-slim as base

# We are Rails developers, so we want to keep our app under /rails directory
WORKDIR /rails

# Here is some Ruby magic and configuration options
ENV BUNDLE_DEPLOYMENT="1" \
  BUNDLE_PATH="/usr/local/bundle" \
  BUNDLE_WITHOUT="development" \
  HOME=/rails

# Throw-away build stage to reduce size of final image
FROM base as build

# Install dependencies that are needed only during build stage
RUN apt-get update -qq && \
  apt-get install -y build-essential curl libpq-dev nodejs git

# Install JavaScript dependencies
ARG NODE_VERSION
ARG YARN_VERSION
ENV PATH=/usr/local/node/bin:$PATH
RUN curl -sL https://github.com/nodenv/node-build/archive/master.tar.gz | tar xz -C /tmp/ && \
    /tmp/node-build-master/bin/node-build "${NODE_VERSION}" /usr/local/node && \
    npm install -g yarn@$YARN_VERSION && \
    npm install -g mjml && \
    rm -rf /tmp/node-build-master

# Install application gems
COPY Gemfile Gemfile.lock ./
RUN bundle install && \
    rm -rf ~/.bundle/ "${BUNDLE_PATH}"/ruby/*/cache "${BUNDLE_PATH}"/ruby/*/bundler/gems/*/.git

# Install node modules
COPY package.json yarn.lock ./
RUN yarn install --frozen-lockfile

# Copy application code
COPY . .

ARG RAILS_ENV

# If you are already on Rails 7.1+,
# then you will be able to use new SECRET_KEY_BASE_DUMMY=1 variable,
# however below is a workaround for Rails 7.0 and below.
RUN SECRET_KEY_BASE=1 DATABASE_URL=postgresql://dummy@localhost/dummy RAILS_ENV=$RAILS_ENV \
  bundle exec rake assets:precompile

# Start again from base image to throw away anything that is not needed
# from build stage.
FROM base

# Install dependencies that we needed during application run.
# We use PostgresSQL for almost all our projects,
# this is why we install `postgresql-client`.
# Also almost all web applications have image upload and convert functionality,
# so you need to install `imagemagick`.
RUN apt-get update -qq && \
    apt-get install --no-install-recommends -y libvips postgresql-client imagemagick tzdata curl && \
    rm -rf /var/lib/apt/lists /var/cache/apt/archives

# Run and own the application files as a non-root user for security
RUN useradd rails --create-home --shell /bin/bash

# Copy built artifacts: node, gems, application
COPY --from=build --chown=rails:rails /usr/local/node /usr/local/node
COPY --from=build --chown=rails:rails /usr/local/bundle /usr/local/bundle
COPY --from=build --chown=rails:rails /rails /rails
RUN chown rails:rails /rails

USER rails:rails

# Entrypoint prepares the database.
ENTRYPOINT ["/rails/bin/docker-entrypoint"]

# Start the server by default, this can be overwritten at runtime
EXPOSE 3000
CMD ["./bin/rails", "server"]
The document above contains several valuable instructions, but one, in particular, deserves attention: ENTRYPOINT ["/rails/bin/docker-entrypoint"]. Building a Docker entrypoint is one of the upcoming features in Rails 7.1. Again, we can easily use the template from the Rails main branch.
#!/bin/bash -e

# If running the rails server then create or migrate existing database
if [ "${*}" == "./bin/rails server" ]; then
  ./bin/rails db:prepare
fi

exec "${@}"
Why is a file needed? With an ENTRYPOINT command, we can execute something before an actual Docker container start command (the one that is listed on the last line of Dockerfile, but can be overridden, as we see later). In our particular case, it allows us to run database migrations only on a host that runs our application web server and not to run them on a background processing host.
Another new option that will be available in upcoming Rails 7.1 is config.assume_ssl. You can have a closer look at its sources here. When proxying through a load balancer that terminates SSL, the forwarded request will appear as though it’s HTTP instead of HTTPS to the application. This makes redirects and cookie security target HTTP instead of HTTPS. This middleware makes the server assume that the proxy has already terminated SSL and that the request really is HTTPS.
If you are on Rails 7.0 and below, you can easily add the same functionality, create this middleware somewhere in your codebase (e.g. in lib/middleware/assume_ssl.rb), require it in your config/application.rb, and load it in config/environments/production.rb.
# lib/middleware/assume_ssl.rb
#
class AssumeSSL
  def initialize(app)
    @app = app
  end

  def call(env)
    env['HTTPS'] = 'on'
    env['HTTP_X_FORWARDED_PORT'] = 443
    env['HTTP_X_FORWARDED_PROTO'] = 'https'
    env['rack.url_scheme'] = 'https'

    @app.call(env)
  end
end

# config/application.rb
#
Dir[Rails.root.join('lib/middleware/**/*.{rb}')].sort
  .each { |file| require file }

# config/environments/production.rb
#
Rails.application.config.middleware.insert_before(0, AssumeSSL)
At this point application preparation is done and we can start the next phase.
Add Kamal to your application
It is time to install and configure Kamal now. If you are on Rails 7.0 and above, than the easiest way to start using Kamal is to add it to your application Gemfile and bundle. But what if you have older Rails or you use other programming language?
As I already said, Kamal can be used with any language and framework. The easiest way to start using Kamal is to install it with gem command (RubyGems is a package management framework for Ruby, so once you have Ruby installed on your machine, you will be able to use it). I usually use Kamal slightly differently – by creating a dedicated Gemfile for it. This allows me to install only Kamal related dependencies in CD workflow (compared to installing everything if Kamal is in your main Gemfile) and at the same time this approach allows to control Kamal version easily (compared to installing it manually on your local machine and in CD workflow).
Create a folder called .kamal in your application root, create a file called Gemfile in it, after this copy code from the example below to it.
# frozen_string_literal: true

source 'https://rubygems.org'

gem 'kamal', '~> 1.5.0'
After this you can run bundle.
BUNDLE_GEMFILE=.kamal/Gemfile bundle install
Don’t forget to create a binstub to run Kamal easier locally and on a GitHub.
BUNDLE_GEMFILE=.kamal/Gemfile bundle binstub kamal --path ../bin
Now you are ready to create deployment configuration.
./bin/kamal init
The command above will create a default deployment configuration, which you can find in the config/deploy.yml file. Version that fits my application need is listed below.
# Name of your application. Used to uniquely configure containers.
service: onetribe

# Name of the container image.
image: onetribe

# Deploy to these servers.
servers:
  web:
    - "//web IP//"
  sidekiq:
    cmd: bin/sidekiq
    hosts:
      - "//sidekiq IP//"

# Use a different ssh user than root
ssh:
  user: www

# Credentials for your image host.
registry:
  # Specify the registry server, if you're not using Docker Hub
  server: AMAZON_ID.dkr.ecr.us-east-1.amazonaws.com
  username: AWS

  # Always use an access token rather than real password when possible.
  password:
    - KAMAL_REGISTRY_PASSWORD

# Container builder setup.
builder:
  args:
    RUBY_VERSION: 3.2.2
    RAILS_ENV: production
		NODE_VERSION: 18.12.0
		YARN_VERSION: 1.22.19
  multiarch: false
  cache:
    type: registry
    image: onetribe-build-cache
    options: mode=max,image-manifest=true,oci-mediatypes=true

# Container run setup
env:
  clear:
    RAILS_LOG_TO_STDOUT: 1
    RAILS_SERVE_STATIC_FILES: 1
    RAILS_ENV: production
  secret:
    - RAILS_MASTER_KEY
    - DATABASE_URL
    - REDIS_URL

# Configure a custom healthcheck (default is /up on port 3000)
healthcheck:
  path: /health
Kamal configuration is pretty straightforward, but several important things must be remembered. Let’s begin with the servers section. This is where you describe your virtual machines or bare metal servers (in our case, EC2 instances), what they will run, and their IP addresses. For this example, we will not create a too complex configuration and assume you have two instances: one to run your web server (likely Puma) and another to run your background processing solution (in our case, Sidekiq).
Keep in mind, that Kamal uses SSH access to your servers to make deploy and in this case, it is very similar to Capistrano (both tools use SSHKit Ruby library). You can configure SSH connection parameters in ssh section. In our case, we specified that www user will be used to establish a connection.
In registry section container registry parameters are specified, in our case AWS Elastic Container Registry address and username (default to AWS). KAMAL_REGISTRY_PASSWORD contains password that will be used to access the registry during a build. It can be populated in several ways, e.g. locally you can run aws ecr get-login-password --region us-east-1 to get a password, but we will automate this later with GitHub Actions.
The builder section contains the container build parameters. It’s worth noting that by default, Kamal utilizes Docker buildx to prepare containers for local and remote architectures. However, if you’re building your container on the same architecture as the one you’re deploying to, you can disable this behavior with multiarch: false. In our case, we’ll be using GitHub Ubuntu runners to build the containers and AWS EC2 Ubuntu instances to run them, both of which have the X86_64 architecture so that we can disable multiarch. Anything specified in the args field will be passed to the Dockerfile during the build process. One aspect of Kamal that I find particularly appealing is the ability to specify Ruby (and Node, Yarn) versions in just one place — the deploy.yml file. This eliminates any concerns about upgrading Ruby to version 3.3 on a specific date, as the only place you’ll need to make that update is in your deploy script, ensuring that your application runs on the latest version of Ruby.
One option from builder needs special attention and this is cache. Docker build cache can be used to significantly reduce build time. You can read more about build cache in official Docker documentation here: https://docs.docker.com/build/cache. Kamal only supports registry and gha (GitHub Actions) cache type, however in most of cases registry cache seems like the most convenient option.
In the env section, you’ll find the variables used to run the container, divided into clear and secret subsections. Clear variables are typically static and specified directly in the deploy configuration, remaining unchanged during deployment. On the other hand, secrets are covered during deployment and stored securely. We’ll use GitHub Secrets to populate these variables, and I’ll demonstrate how to do that later on.
Prepare AWS EC2 instance(s) and AWS ALB
In JetRockets, we usually use Ansible and TerraForm to configure all virtual machines and networks. I will not go too deep into AWS configuration and will cover only the required things. We aim to create required EC2 instances, configure them to run Docker, and configure AWS ALB.
We will go with Ubuntu 22.04.
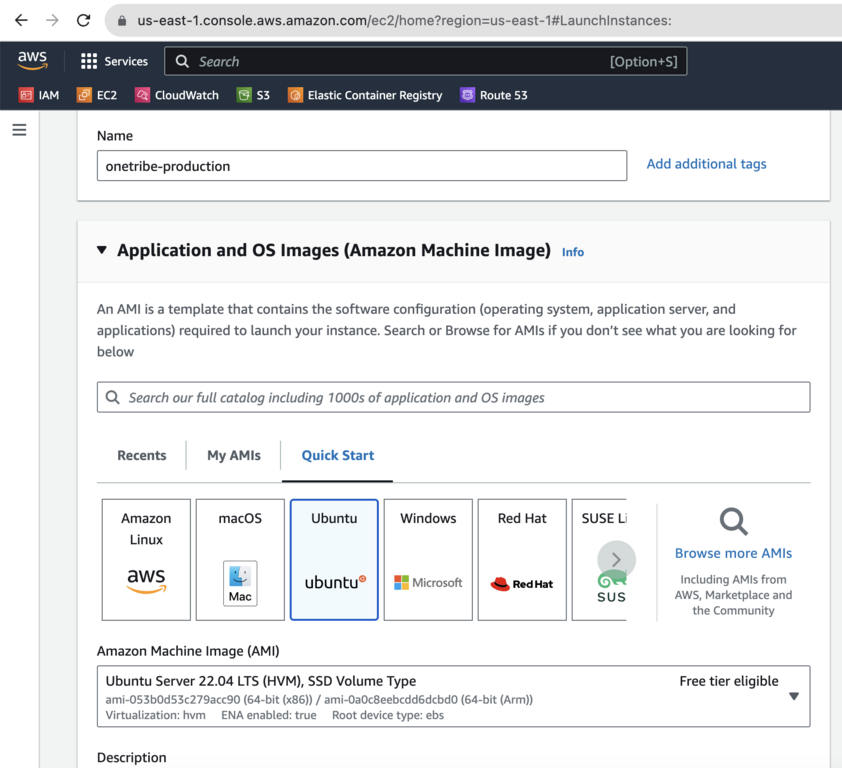
After the instance has been created don’t forget to allocate and associate the Elastic IP address with it. Put the newly obtained IP address to your Kamal config into servers section. Once the instance is up and running, connect to it with the default user (usually ubuntu) and install Docker to run our containers. You can read more about this in Docker official manual. Long story short, you should install docker-ce and docker-ce-cli.
Once Docker is installed, create a user that will be used to run web services. I usually go with www username for this.
ubuntu@ip-172-31-86-216:~$ sudo useradd -d /srv/www -m -s /bin/bash --groups docker www
Connect to it via SSH and create user that will run Docker containers. I prefer to give www username to it, but this is up to you.
www@ip-172-31-86-216:~$ docker ps
CONTAINER ID   IMAGE     COMMAND   CREATED   STATUS    PORTS     NAMES
www@ip-172-31-86-216:~$
The instance is ready. Time to configure ALB. Create new Application Load Balancer and configure two listeners on it. I find it easier to create a balancer with just one listener and configure everything when balancer already exists.

The key point is that we redirect all HTTP/80 traffic to HTTPS with 301 response code. For HTTPS configuration is also very clear: we forward all HTTPS traffic that comes from onetribe.team and *.onetribe.team to kamal target group (that includes the previously created EC2 instance) through HTTP 80 port. This is where SSL termination happens.
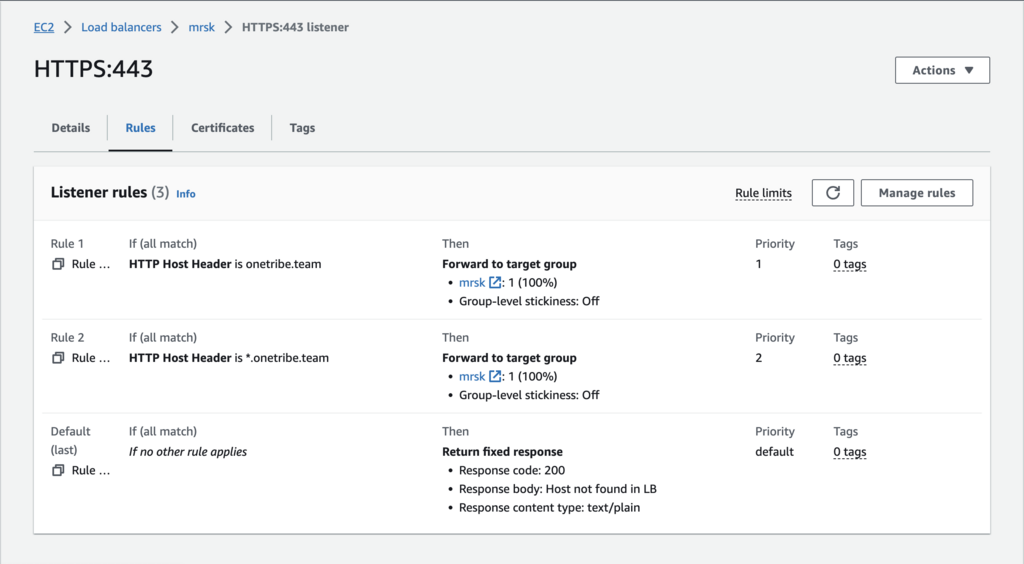
That covers the basics of the AWS setup. If you need additional instances to handle Sidekiq or to serve web requests, you can simply duplicate the existing EC2 instance.
GitHub Actions scenario
GitHub Actions stands out as a highly favored choice for continuous deployment (CD) due to its exceptional integration with GitHub and its remarkable flexibility. Its seamless integration enables developers to trigger deployments based on specific events effortlessly, customize workflows using YAML configuration files, and leverage a vast ecosystem of pre-built actions and integrations. Notably, GitHub Actions excels in scalability and parallelization, effortlessly handling larger applications and intricate deployment scenarios by executing multiple tasks concurrently to minimize the deployment time. Furthermore, the platform offers extensive visibility and logging features, facilitating progress tracking and troubleshooting within the GitHub interface. The thriving GitHub community actively contributes to the availability of shared workflows and reusable actions, empowering developers to expedite their CD implementation and leverage established best practices.
To facilitate comprehension, I have provided a GitHub Actions file below that we successfully used for building and deploying a Rails application with Kamal. In this file, I have added comments to highlight the essential components and make it more approachable. For easy integration, feel free to copy this file into your application folder as .github/workflows/build_production.yml.
name: Kamal

on:
  push:
    branches:
    - master

jobs:
  spec:
    uses: ./.github/workflows/specs.yml
  lint:
    uses: ./.github/workflows/lint_code.yml

  build_and_deploy:
    needs: [spec, lint]
    runs-on: ubuntu-latest
    timeout-minutes: 20
    outputs:
      image: $
    env:
      RAILS_ENV: production
    steps:
      - uses: actions/checkout@v3
        with:
          ref: $
      - uses: webfactory/ssh-agent@v0.7.0
        with:
          ssh-private-key: $
      - uses: ruby/setup-ruby@v1
        env:
          BUNDLE_GEMFILE: ./kamal/Gemfile
        with:
          ruby-version: 3.2.2
          bundler-cache: true
      - name: Set up Docker Buildx
        uses: docker/setup-buildx-action@v2
        with:
          driver-opts: image=moby/buildkit:master
      - name: Configure AWS credentials
        uses: aws-actions/configure-aws-credentials@v1
        with:
          aws-access-key-id    : $
          aws-secret-access-key: $
          aws-region           : us-east-1
          mask-aws-account-id  : 'no'
      - name: Login to Amazon ECR
        id  : login-ecr
        uses: aws-actions/amazon-ecr-login@v1
      - name: Kamal Envify
        id  : kamal-envify
        env :
          KAMAL_REGISTRY_PASSWORD: $
          DATABASE_URL: $
          REDIS_URL: $
          RAILS_MASTER_KEY: $
          DOCKER_BUILDKIT: 1
          BUNDLE_GEMFILE: ./kamal/Gemfile
        run: |
          ./bin/kamal envify

      - name: Kamal Deploy
        id: kamal-deploy
        run: |
          ./bin/kamal deploy
The workflow above is pretty straightforward, but some parts needed to be clarified.
- name: Set up Docker Buildx
  uses: docker/setup-buildx-action@v2
    with:
      driver-opts: image=moby/buildkit:master
I use buildx action from the master branch, the reason to do this is that BuildKit supports caching to repositories other than DockerHub only in 0.12 version, which is not released yet (you can read about this more on GitHub: Issue #876).
- name: Kamal Envify
  id  : kamal-envify
  env :
    KAMAL_REGISTRY_PASSWORD: $
    DATABASE_URL: $
    REDIS_URL: $
    RAILS_MASTER_KEY: $
    DOCKER_BUILDKIT: 1
    BUNDLE_GEMFILE: ./kamal/Gemfile
  run: |
    ./bin/kamal envify

- name: Kamal Deploy
  id: kamal-deploy
  run: |
    ./bin/kamal deploy
Before running kamal deploy that will start build process and deploy application to EC2 instances I do kamal envify and this is an the change from Kamal 1.0.0 release. Before 1.0 Kamal (MRSK) used docker run -e option to pass variables to images. With 1.0 Kamal switched to docker run --env-file option which uses .env files from hosts to start containers (read more about this here).
After all, preparations have been done; we are ready to deploy our app. After pushing code to the master branch our Kamal workflow will start automatically.
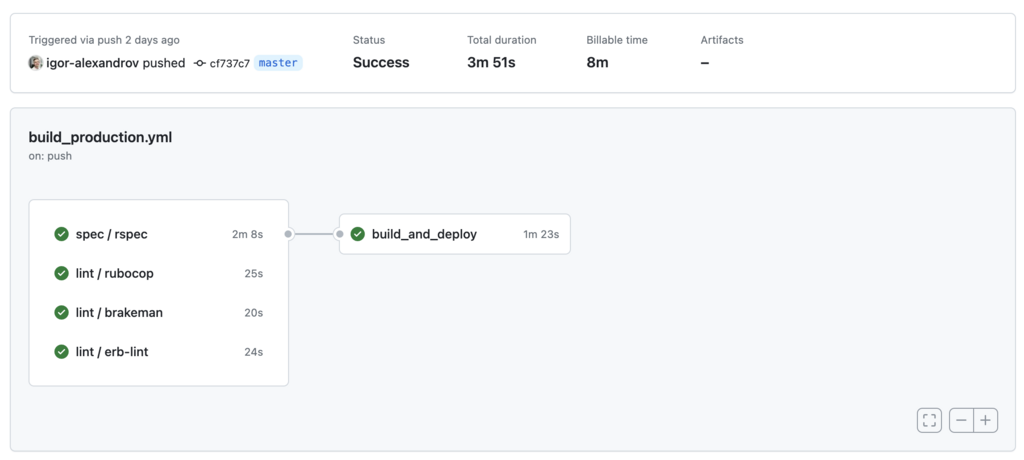
As you can see, the entire process of Docker build and deploy was completed in 1 and half minutes. This is quite impressive because I’ve used a EC2 medium instance to run the application and GitHub standard runners to build it.
Additional tweaks and Traefik configuration
Once our application is up and running, it’s essential to be prepared for potential issues that may arise. Knowing where to look and how to troubleshoot effectively becomes crucial in such cases. While the most common approach is to examine application logs, we have already taken steps to configure our Rails application to write logs to stdout using RAILS_LOG_TO_STDOUT=1.
This configuration choice allows us to conveniently access and review the logs. By analyzing the log output, we can often identify error messages, warnings, and other valuable information related to the application’s behavior. Familiarity with the log structure and understanding the log levels used within our application is vital for effective troubleshooting.
With STDOUT logging you can access your application container logs from your host machine with docker logs <container_id> --follow, you will probably see something like this:

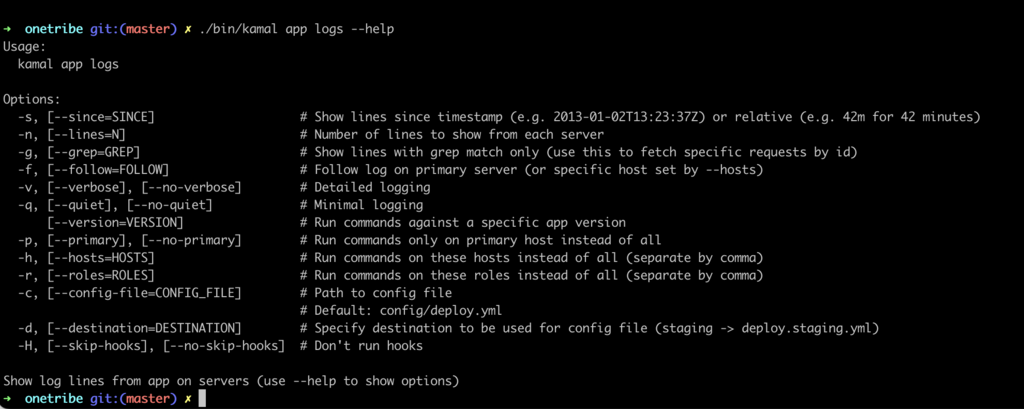
An alternative approach for accessing application logs is by using the ./bin/kamal app logs command directly from your development machine. This method offers a more developer-friendly experience.
The ./bin/kamal app logs command provides convenient options to enhance log analysis. For instance, you can use the grep command to search for specific log entries, and filter logs by timestamp, hosts, or roles. To explore the available options, you can use the --help flag, which provides a comprehensive list of command options and their functionalities.
It’s essential to consider that we are utilizing Docker, which provides a variety of logging drivers, including integration with AWS CloudWatch.
To configure Kamal for sending logs to CloudWatch, it can be easily accomplished within the logging section. By default, Docker sends only the container ID as a tag, which might not be sufficient, particularly if our setup involves multiple roles (such as web and background processing). To enhance readability, I suggest adding the container name to the tags, resulting in more meaningful log stream names.
By making this adjustment, we can ensure that logs from our Kamal deployment are properly tagged and organized within CloudWatch. This facilitates easier navigation and analysis of logs specific to different roles or components within our application.
Taking advantage of Docker’s logging capabilities, combined with the integration of Kamal and AWS CloudWatch, empowers us to streamline log management and gain valuable insights into the behavior and performance of our application.
logging:
  driver: awslogs
  options:
    awslogs-region: us-east-1
    awslogs-group: /application
    awslogs-create-group: true
    tag: "-"

To enable awslogs on your host machine, you must provide AWS credentials. This can be achieved by installing awscli and configuring it from the root user.
root@app:~# apt install awscli
root@app:~# aws configure
Traefik Logging
In addition to having application logs in CloudWatch, we can configure Traefik, our reverse proxy, to write its own logs directly to AWS as well. This can be achieved by passing specific arguments to the traefik.args configuration section.
By configuring Traefik to write logs to AWS, we can centralize all our log data in one place, making it easier to manage and analyze. The access log feature is particularly useful, and we can even apply filters to improve log cleanliness. For instance, we can set a minimum duration filter (e.g., 10ms in our example) to exclude log entries for /health requests, simplifying log maintenance and reducing clutter.
traefik:
  args:
    log: true
    log.level: ERROR
    accesslog: true
    accesslog.format: json
    accesslog.filters.minduration: 10ms
To apply the Traefik log configuration don’t forget to run ./bin/kamal traefik reboot.
Conclusions
During my discussions with various DevOps engineers about Kamal, I encountered a wide range of opinions, ranging from “I don’t see the need for it since we already have AWS ECS, Docker Swarm, and Kubernetes” to “It’s a valuable tool.” This divergence in perspectives is not surprising, considering that Kamal is a tool designed by developers for developers. Its ease of understanding, configuration, and usage contribute to its appeal. Furthermore, even in its current version (1.0.0), Kamal is known for its stability, speed, and readiness for production environments.
Ultimately, the decision to utilize Kamal or any other tool hinges on various factors such as project requirements, familiarity with existing solutions, team preferences, and the application’s specific needs under development. It is crucial to carefully evaluate the advantages and disadvantages of different tools to make an informed decision that aligns with the unique circumstances of each project.
Throughout my 15 years of working with Rails, I have witnessed the transformative impact of Rails-first tools on the development community, extending beyond Ruby alone. Examples such as ActiveRecord and Capistrano from 15 years ago, along with more recent additions like ActionCable, Turbo, and Hotwire, have revolutionized how developers work. Given this history, it appears that Kamal has a promising opportunity to make a similar impact again.